

How Do You Get a Backyard Stream to Flow in a Flat Yard?

by Tory Jon | Last Updated: November 05, 2026
A flat lawn can make a backyard stream seem out of reach. You can picture the winding water and small cascades, but there is no hill for them to come down.
Yes, you can build a stream in a flat yard. You create a small height difference within the water feature itself. Soil dug from the lower basin can help raise the stream's starting point, while a hidden pipe carries pumped water back uphill. The part that needs careful planning is the basin: it must hold both its usual water and the extra water that returns when the pump stops.
Picture one simple layout
Imagine a narrow stream along the edge of a patio, with its starting point on a low mound near a planting bed. The channel curves gently toward a small open pond at the other end. Most of the surrounding lawn stays at its original height.
For a planning example, picture these dimensions:
- A stream about 12 feet long, with an average wet width of 18 inches.
- A starting spillway about 12 inches above the surrounding lawn.
- A lower basin with a roughly 4-by-4-foot water surface and a bottom 24 inches below its overflow level.
- A rough planning area of 20 feet long by 8 feet wide, including the mound, edging, and working access.
These are example dimensions, not a construction plan or a minimum size. Large stones and broad mound slopes may need more space. Lay the whole outline out with a garden hose before digging, including the basin and the ground around the raised start.
In this layout, the lower basin is an open pond without fish. That keeps the example focused on water movement and storage rather than fish habitat and filtration.
Get Our Best Pond Tips Sent to Your Inbox for Free!
Join thousands of others and learn from our decades of pond building and maintenance experience! Your pond will thank you!
By subscribing you agree to receive emails from PondAcademy.com. We will always respect your privacy and you can unsubscribe at any time.
Dig the basin and use its soil to raise the start
Start by checking local permit and barrier requirements. In the United States, contact 811 before digging and wait for the required utility markings. Private lines, such as irrigation pipes or power to an outbuilding, may need separate locating.
Digging the basin gives you a place to collect water and a supply of soil for the raised stream. Set the topsoil aside for planting outside the liner. Use suitable mineral soil from below it to form a broad, low mound beneath the stream's upper section.
Build that mound in thin layers and compact each layer before adding the next. A loose pile can settle beneath the liner and stone, lowering a bank or tilting a spillway. Keep roots and other material that will decay out of the supporting fill. The amount of usable soil depends on what comes out of your excavation, so plan for the possibility of needing additional fill.
Spread the mound into the surrounding ground rather than making a steep cone. The raised area needs to support the channel and its edging, with room on either side for gentle slopes. Heavy boulders need firm support of their own; avoid balancing them on loose fill or narrow basin edges.
A flexible liner contains the water in this kind of artificial stream. Prepare a smooth base and use protective underlayment to reduce the risk of liner punctures. Soil from the excavation belongs beneath or outside the lined channel, where flowing water cannot wash it away.
The pump goes uphill; the open channel goes downhill
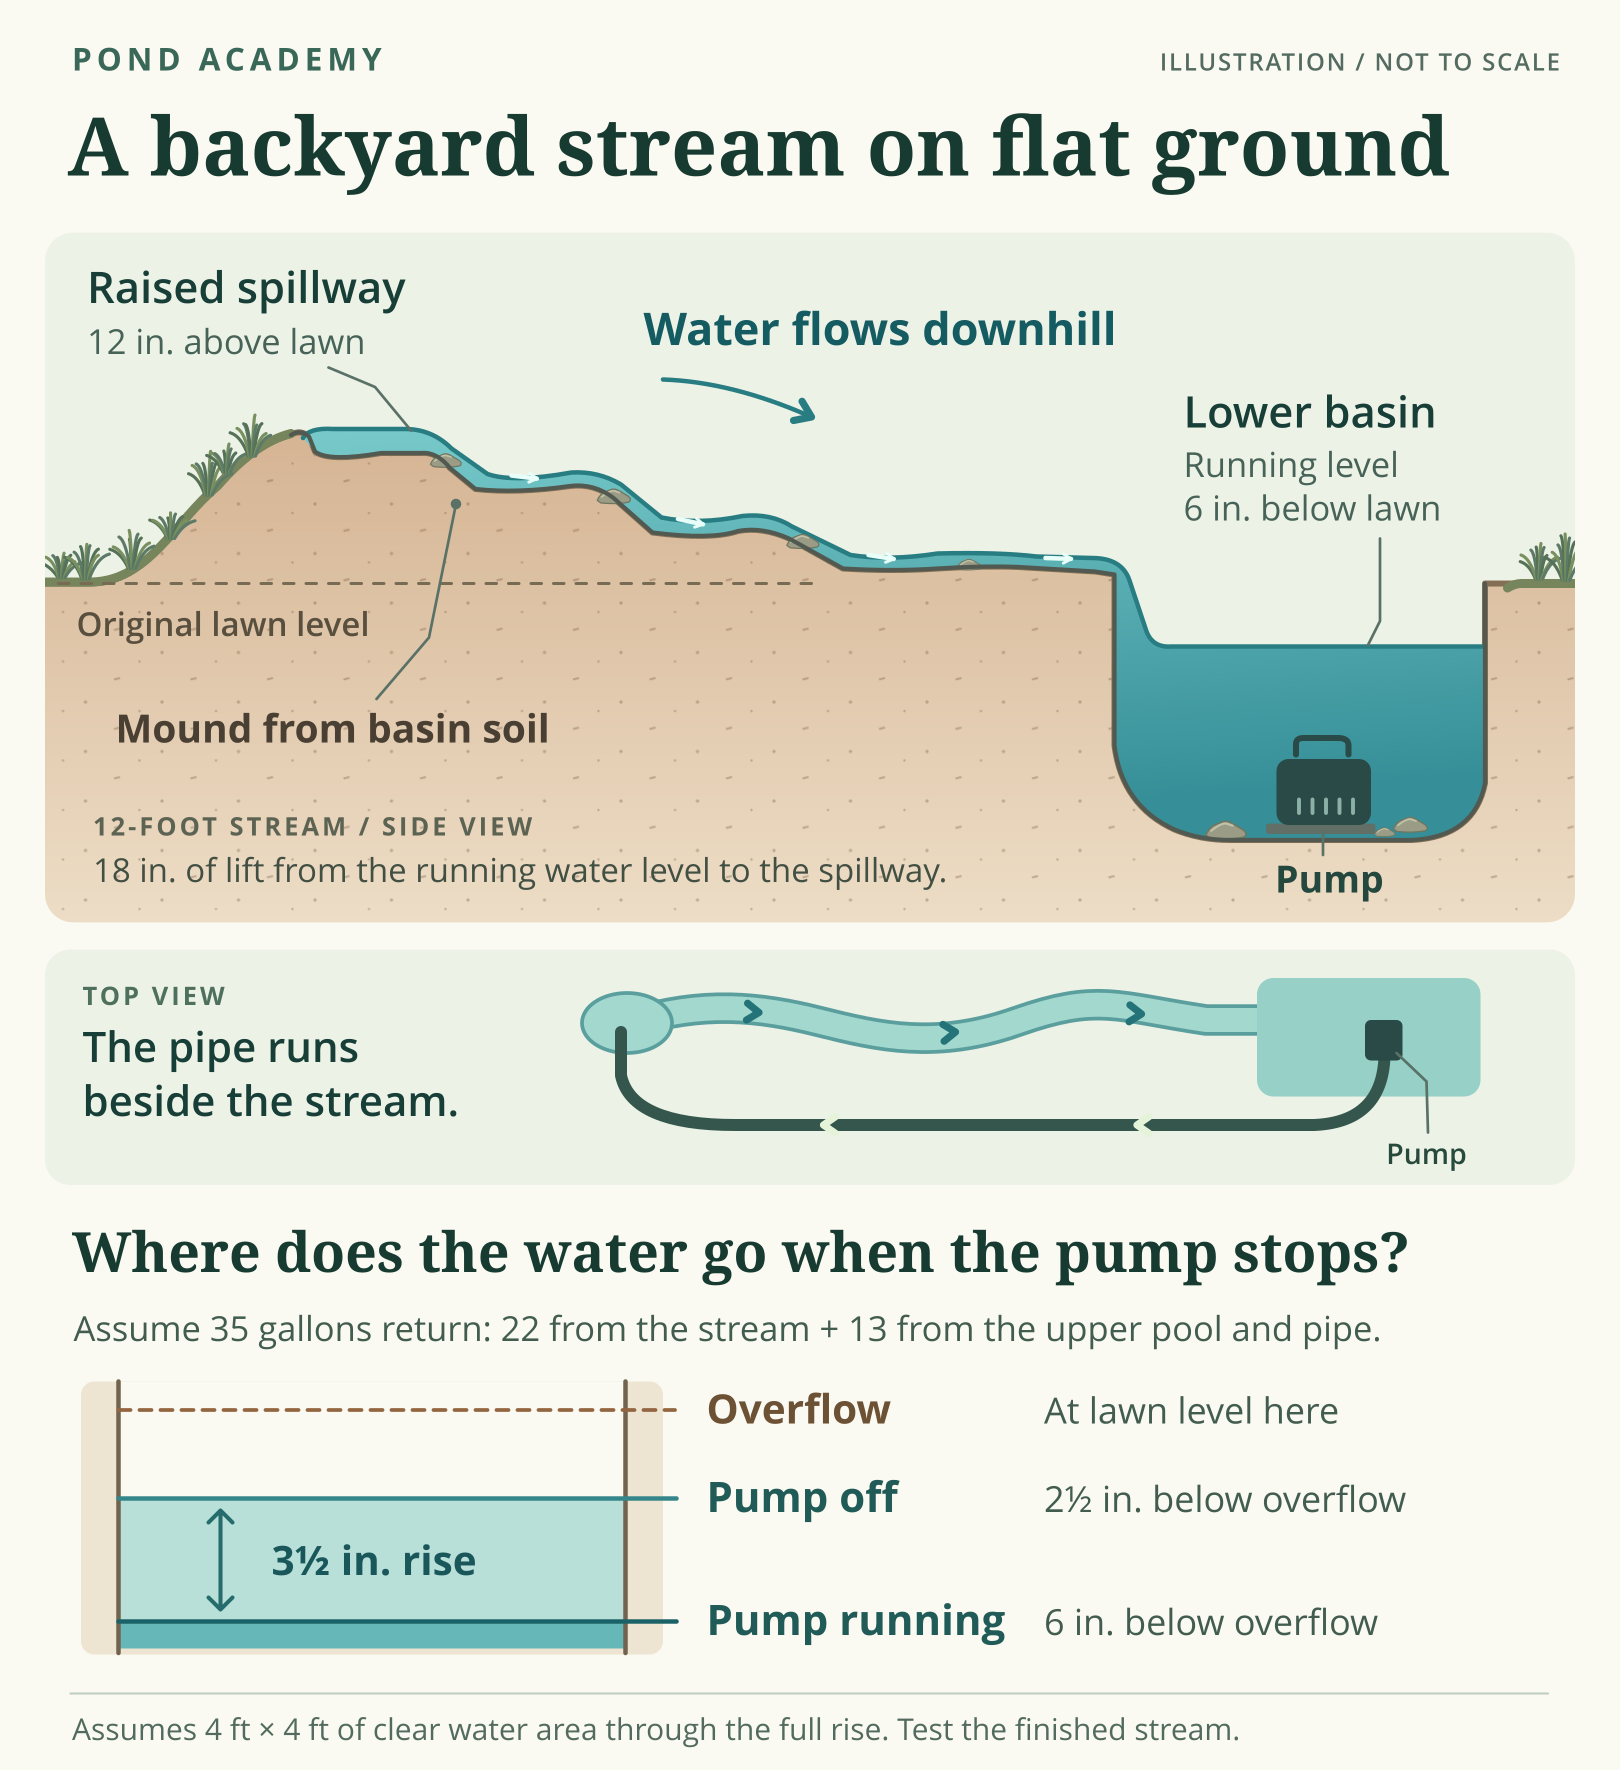
The water follows one continuous loop. A submerged pump in the lower basin sends water through a pipe running beside the stream. That pipe climbs to the raised starting pool, where the water spills into the open channel and flows back to the basin by gravity.
The pump supplies the uphill movement. Gravity supplies the downhill return. Once the pump stops, the stream gradually stops flowing too.
Route the pipe where you can reach its connections without dismantling the channel. Leave a clear place to lift out the pump for cleaning. Hiding access beneath a removable cover or a small edging stone is much easier to live with than burying it under a heavy boulder.
Measure lift from the basin's water surface
For pump planning, measure the vertical distance from the basin's operating water surface to the upper discharge. The pump's depth beneath the surface is not added to that static lift.
In our example, suppose the basin's running water level sits 6 inches below lawn level and the upper discharge sits 12 inches above the lawn. The vertical lift is about 18 inches, or 1.5 feet.
The pipe also resists flow. Its length and inside diameter affect that resistance, and bends add more. Check the pump's flow chart at the combined lift and pipe resistance, often called total dynamic head. The largest flow number on a pump label is not the flow you can assume at the top of the stream. Pump capacity and lift need to be considered together.
Have any new outdoor circuit or receptacle installed to local electrical requirements by a qualified electrician. Use ground-fault circuit-interrupter protection, which helps protect against electric shock, and disconnect power before handling the pump.
Shape a downhill water path inside the mound
You can distribute the available drop along the channel instead of putting it all into one waterfall. In this example, a couple of low stone spillways can separate short, shallow reaches. Each spillway releases water into a lower section until the stream enters the basin.
Use a level or laser level to check the planned spillway heights. A yard that looks flat can still have small changes in grade, and a channel that looks downhill can contain an accidental hump. Water will back up behind that hump until it finds a way over or around it.
Keep both liner edges above the highest water level reached during operation. Pay particular attention to bends and the areas just upstream of spill stones, where water may rise higher than expected. Allow extra liner width for these banks rather than cutting it closely around the visible stream.
The liner must also catch water that travels beneath or beside decorative rocks. A stone can guide the visible flow, but the waterproof channel underneath has to carry the whole return back into the basin. Use one continuous liner where practical, or properly joined sections suitable for the liner material.
Keep surrounding runoff outside the feature. Grade the nearby ground so muddy lawn water cannot enter over a low bank, and keep soil and mulch from bridging over the liner edge into the wet channel.
Leave room for water that drains back
When the pump runs, some of the system's water is up in the stream and its supply pipe. When power shuts off, the portion that can drain downhill returns to the basin. The basin's water level rises.
The space available to receive that returning water is its drain-back storage. Count only the usable space between the normal running water level and the overflow level. Water already sitting below the running level occupies storage that the returning stream water cannot use.
Estimate the returning stream water
For a rough rectangular estimate, multiply length by average wet width by average draining depth, all in feet. Multiply that result by 7.48 to convert cubic feet to US gallons.
Suppose our 12-foot stream averages 1.5 feet wide and releases an average of 2 inches of water depth when shut off:
12 × 1.5 × (2 ÷ 12) × 7.48 = about 22 gallons.
That is an illustrative estimate. The draining depth is the change between running and stopped conditions, rather than the full depth of every pocket. Pools that remain filled after shutdown retain some water, while a raised starting pool may release additional water.
Next, add the water that drains from the supply pipe and any upper pool volume not included in the channel estimate. For this example, assume those contribute another 13 gallons. The estimated return is then about 35 gallons.
You might reserve 50 gallons of usable space while planning this example, leaving some room beyond that estimate. That allowance is a design choice for this illustration, not a universal sizing rule. The finished shutdown test must confirm the actual return volume.
Check what the basin can really hold
A straight-sided basin with a clear 4-by-4-foot surface has about 60 gallons of storage in its upper 6 inches:
4 × 4 × 0.5 × 7.48 = about 60 gallons.
That would give our example more storage than the estimated 35-gallon return. But sloping sides reduce the space. Rocks or shelves within that upper band reduce it further. Calculate the usable water space in the finished shape, rather than relying on the outside dimensions of the hole.
The running level must also keep the pump submerged to the depth required by its instructions. If creating storage above the running level leaves the pump too shallow, enlarge or deepen the basin before finishing the edges.
A buried, stone-filled reservoir follows the same principle, but only the spaces between stones hold water. Its excavation volume can greatly exceed its usable water capacity. An open basin makes the storage calculation easier to picture.
Test shutdown before finishing the edges
Leave the liner edges accessible until you have checked the feature at its intended flow. This is the time to adjust a low bank or enlarge the basin, before plants and heavy edging make changes harder.
- Fill the basin, start the pump, and let the upper pool and channel fill. Confirm that the pump remains submerged and the basin level stops falling.
- Check the whole stream for escaping water, including behind spill stones and along bends.
- Shut off the pump and wait until water has finished draining back. The basin must contain it below the planned overflow level, with room left for rainfall.
- Restart the pump without adding water. Confirm that the basin can refill the stream while keeping the pump submerged.
- Repeat after changing the flow or moving stones that alter water depth. Mark the normal running level and the fully drained shutdown level.
Provide a controlled overflow route for excess rainwater, directed away from foundations and neighboring property and handled according to local drainage rules. Keep the liner edge above that overflow level.
Once testing is complete, finish the edging without lowering the banks. When topping off later, use the marked level for the system's current state. Filling a running basin to its shutdown mark uses up the space needed for returning water.
A flat yard can support a convincing little stream with a modest raised start. Plan the mound, channel, and lower basin together, and give returning water a measured place to go when the power switches off.


