5 DIY Pond Filter Ideas & Tutorials (With How-to Videos)

by Tory Jon | Last Updated: April 21, 2021
Pond Academy is reader-supported. Buying through links on our site may earn us an affiliate commission. As an Amazon Associate I earn from qualifying purchases.
By making your own pond filter, you can potentially save hundreds of dollars!
It also gives you the opportunity to make a filter to your exact specs – the size of the filter, the media type, and so on.
Here are 5 DIY pond filter ideas with step-by-step instructions, how-to videos and a materials list for each one.
Plus, I highlight my recommended DIY pond filter plan below!
How To Make A Gravel & Sand Filter For Fish Pond
This is an effective DIY barrel filter for large ponds (even when stocked with lots of pond fish) and uses natural gravel of varying sizes to clean the water. This is not a biofilter, but you can pump the water from this filter to a biofilter then to your pond or water garden.
It’s best for pond pumps rated up to 2500 GPH. Any more than that and you risk the fine gravel/sand fluidizing and not effectively filtering debris.
Materials
- 55-gallon drum
- 3” bulkhead fitting x 2
- 2” shower drain
- 6’ ABS pipe (1.5” diameter)
- 90 degree fitting for ABS pipe
- 3 way fitting for ABS pipe
- End caps for 1.5” ABS pipe
- Bricks x 4
- Gravel (3/4”, ½” and pea)
Instructions
- Cut holes in the lid of the drum to allow room for the Saws all blade to cut the lid off, then carefully cut the lid off.
- Keep the lid and drill a hole every square inch with a 3/8 drill bit.
- Next, take a 3” hole saw and drill 2 holes about 8” from the top on opposite sides of the drum.
- Use a sanding bit and a rotary tool to clean out the holes.
- Insert the male end of a 3” bulkhead fitting from the outside in. The female end should be on the outside.
- Use silicone caulk on both ends before screwing both the male and female ends to make the seal waterproof.
- Repeat steps 5-6 for the other 3” hole.
- Flip drum over and drill a 3” hole on the bottom and install a 2” shower drain. Silicone caulk around the drain.
- Make sure you use a 2” one-way check valve at the shower drain to stop water from flowing out of the drum into the pond pump.
- Next, we will make the air manifold using 6’ of 1.5” ABS pipe, a 90-degree fitting and a 3-way fitting. Attach the 90-degree fitting to the end of the 6’ pipe, and attach the 3-way fitting to the 90-degree fitting.
- Cut off pieces of your 6’ pipe and attach to the ends of the 3 way fitting, so all 3 reach the edge of the inside of your drum.
- Glue all the fitting joints and glue on end caps to the ends of the 3 pipes coming off the 3-way splitter.
- Next drill holes every inch on the bottom and sides of each of the three protruding pipes.
- Place air manifold into the drum, with the 3-way splitter end on the bottom and place the 4 bricks strategically around the pipes.
- Then slide the lid that you previously drilled holes into down into the drum, lying flat (the gravel will sit on top of this).
- Fill the drum with first a layer of ¾” gravel, then ½” gravel, then pea gravel, then a layer of chicken grit or large sand.
- The drum will need to sit on blocks to allow room to hook up the pond pump to the bottom of the drum.
- You can optionally send the clean filtered water from this drum to a biological filter or straight back into your pond or water garden.
Easy Homemade Pond Filter With 5 Gallon Bucket
This extremely simple and quick DIY pond filter goes together in about 10 minutes and is recommended for pumps rated at about 300-400 GPH. Included are instructions on how to hook up the MJ1200 pond pump by Cobalt.
If you're interested in making a pond filter without electricity, this would be a good smaller filtration system to pair up with a solar pond pump.
Materials
- 5 Gallon bucket with a lid
- 1” or larger bulkheads x 2
- PVC pipe
- Bio balls (and any other pond filter media you like)
- Never-clog air stone
- Airline
- Optional pump used in video: MJ1200 pump by Cobalt (if you don’t have an existing pump)
- Elbow, threaded coupling, 1” to ¾”
- ¾ to ½” Barb
- Standard 5/8 plastic tubing – 6’ (to connect to the pump)
- Hose clamps
Instructions
- Flip bucket upside and drill a hole the size of your bulkhead. Make sure the hole is not in the center of the bottom of the bucket, but more off-center (towards) one of the sides.
- Install the bulkhead in the hole you just cut in the bottom of the bucket.
- Next, drill a hole in the center of the bucket’s lid for the other bulkhead.
- Install the bulkhead in the hole you just cut into the center of the lid (flat side of the bulkhead should be on top).
- Cut the PVC pipe to about the length (height) of the bucket (just an inch or two short) and attach to the bulkhead in the lid of the bucket
- Cut another piece of PVC pipe about 3” shorter than the one you just cut and attach to the bulkhead in the bottom of the bucket.
- If using the optional MJ-1200 pump, attach the barb to the elbow coupling. If not, skip to step 12 (keep in mind you will have to connect your pump to the lid of the bucket still).
- Then cut a 3” piece of your PVC pipe and connect to the other end of the elbow coupling.
- Then attach the PVC end to the top of the bulkhead on the lid of the bucket.
- Next, attach your standard 5/8” tube to the MJ-1200 pump and tighten with your hose clamp.
- Then attach the other end of your standard tubing to the barb (attached to the elbow) on the lid of your bucket.
- Fill the bucket with bio balls (and any other filter media you like).
- Lastly, we want to install an airline into the filter to help create a current inside the filter and mix it up. Drill a hole in the top of the lid big enough to thread through an airline.
- Attach the air stone to the end of the airline (the end that is in the bucket).
- Place the bucket over your pond, so that the bulkhead on the bottom of the bucket drains into the pond. If you don’t want the bucket to be visible, you can hide it and connect hose or pipe from the bulkhead on the bottom and run it to the pond, as long as gravity will drain the water from the bucket, through the pipe, and into the pond.
How To Make A Biological Pond Filter Out Of A Planter
This is an effective and cost-friendly way to make a DIY pond filter that adds a sense of style to your pond or water garden. It uses a mixture of biological and mechanical media for effective filtering. You’ll be up and running in under an hour with this decorative filter!
It's also another perfect sized filter to try out a solar pond pump if you wanted to filter your pond water without electricity.
So, lets learn how to build this pond filter step-by-step!
Materials
- Planter (If your filter is going be visible you may want to choose a decorative planter)
- Bulkheads x 2
- PVC pipe (length depends on your planter. It just needs to be longer than your planter)
- PVC elbow fittings x 3
- PVC “T” fitting
- PVC SCH 40 adapter
- Hose
- Hose clamps x 2 (one to connect the filter to the hose and the hose to the pump)
- Basket (For example, a small clothes basket or a plastic fruit basket that will fit inside your planter)
- Loofa’s
- Pot scrubbers
- Bio balls
- Pebbles/rocks or lava rocks
- Optional: Oxygenating pond plants
Instructions
- Trace the hole of the bulkhead on the side of your planter, near the top.
- Cut out the hole you traced. You may have to drill a hole first so you can insert your saw blade to cut out the hole.
- Check if the bulkhead fits in the hole. You may have to widen the hole slightly.
- Install the bulkhead into the hole. (You may need to install another bulkhead on the opposite side to act as an overflow if your filter starts overflowing).
- Now we need to install the second bulkhead at the top of the planter where the water will enter the filter at.
- Following the same steps above, cut out the hole for the second bulkhead.
- Cut a section off your PVC pipe about 3” less than the height of your planter. Set to the side. We will now need to cut the remaining PVC pipe into three different lengths – one that is about as long as the radius of the planter AND two that are equal in length, but about half the radius of the planter.
- Connect the longer PVC piece to an elbow connector and the piece that is the radius of the planter.
- Connect the PVC SCH 40 adapter to the end of the piece that is the radius of the planter.
- Connect the two half radius PVC pieces together with the “T” PVC fitting.
- Connect a PVC elbow to the other ends of each half radius PVC pipe. Make sure the elbows point in opposite directions.
- Next, connect the remaining “T” fitting opening to the long piece of PVC pipe.
- Screw the PVC piece that has the PVC SCH 40 adapter to the bulkhead in your planter.
- Tighten the other side of the bulkhead.
- Take your basket and put a slit in the side of it so you can slide it around your PVC pipe, which will allow it to slide it down into the planter.
- Slide the basket down into the planter, with the large opening at the top of the basket to go down in first (Basically inserting the basket into the planter upside down).
- Now we can start adding our own diy pond filter media. Add a layer of loofah's as the first filter layer.
- Next, add sponges/pot scrubbers as the second filter layer. Make sure there aren’t any holes in the sponge layer as we want the water to pass through the sponges completely.
- Add a layer of microfilter (like used for an air conditioner) (optional).
- Add a layer of bio-balls.
- Add another few layers of sponges on top of the bio-balls.
- Add a layer of carbon on top (optional).
- Add a final layer of sponges (2 layers).
- Add a layer of rocks on top of the sponges.
- Connect a hose to the PVC SCH 40 adapter.
- Screw in the hose with the adapter to the bulkhead.
- Tighten the hose to the adapter with a hose clamp.
- Connect the hose to your pump and position your planter next to your pond so the filtered water drains into the pond like a waterfall.
DIY Pond Skimmer Filter (With A Garbage Can)
This DIY pond skimmer is an interesting and cheap alternative to more expensive name brand pond skimmers. It does require to be installed before you fill your pond with water. And I would personally make the intake much wider (and rectangle) to make it more useful for larger ponds.
Materials
- 32 Gallon garbage can (If you can find a square that may work better)
- Closet flange 4” x 2
- 4 way 1.5” PVC pipe fitting
- 1.5” PVC pipe – 6’ long
- 4” PVC pipe - 2’ long
- 1.5” PVC end caps x 3
- 1.5” electrical conduit fittings (1 male and 1 female)
- Rubber toilet gasket
- Stainless bolts with matching nuts and washers
- Outdoor silicone caulk
- Small nylon mesh tarp
- Large mesh nylon bag
Instructions
- Using your closet flange, mark the 4” inlet hole a couple inches from the top.
- Cut the inlet hole you just marked.
- Mark the 1.5” outlet hole a couple inches from the bottom of the garbage can.
- Cut the outlet hole you just marked.
- Put the rubber gasket on the male conduit and place this in the outlet hole on the inside of the garbage can.
- Connect the female conduit on the outside of the can to the male conduit.
- Cut 4 pieces of PVC pipe, 3 pieces about 5 inches in length and one piece about 8 inches in length**. We will be building the strainer that the water will pass through the bottom of the can.
- Connect the 4 PVC pieces to the 4-way connector.
- Connect the end caps to the 3 shorter PVC pieces
- Silicone caulk the seals.
- Drill small holes in all the PVC pipe pieces
- Measure and cut a small piece of your 4” PVC pipe and set on the bottom of the garbage can. You will be setting your strainer on this.
- Install the strainer in the bottom of the garbage can, connecting the longer PVC piece to your outlet conduit, ensuring the rubber gasket is between the two.
- We will now need to dig a hole at the location of our pond where we will set the skimmer. You need to make sure that the water level of your pond will be about ¾” of the way up of your inlet on your garbage can skimmer. It’s very important to get this right.
- Place the garbage can in the hole you dug.
- Next, dig a trench leading from your hole where the discharge pipe will go.
- Attach the discharge pipe to your skimmer.
- Next, you will need to install your pond liner, making sure to run the liner up the front of the skimmer and folding it over the top and inside the skimmer.
- Place a closet flange over the inlet hole and mark the holes for the 4 bolts.
- Drill the bolt holes.
- Silicone caulk the face of the flanges and around the inlet opening and connect the two flanges together using the bolts and washers. Allow the silicone to dry.
- Once dried, then we can cut out the rubber liner that’s still covering the opening between the two connected flanges.
- Cut a 10” long piece of 4” pipe and on one end, cut a 45-degree angle.
- Connect the 4” pipe to the closet flange (no need to silicone caulk this).
- Fit the mesh tarp inside the skimmer and secure the trap edges to the outside of the skimmer. The tarp will sit below the intake PVC pipe, so you may have to cut out a 4” hole in the tarp to slide the pipe through. This tarp acts as a filter for fine debris.
- Take your large mesh nylon bag and slide over the end of the 4” inlet pipe. This will act as a filter to catch large debris like leaves. A bag with a pull cord will work great as you can tighten it around the PVC pipe with the pull cord, this way it doesn’t slide off. You can also use two tiny screws to hold it in place.
- For aesthetics, you can place a flat rock on top of your skimmer to cover it up and keep it mostly out of view.
**Note: the size of the PVC pieces may vary depending on the diameter of the garbage can you use. Refer to 1:51 of the video to see how the pipes should fit in the bottom of the garbage can.
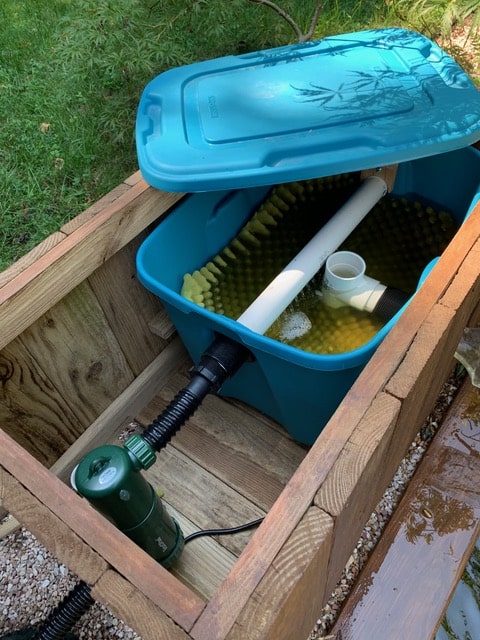
Homemade Biological Pond Filter (Recommended DIY Pond Filter)
This is an extremely well thought out DIY pond filter design and is my recommended filter choice (if I'm not buying a store bought pond filter system)
It includes mechanical and biological pond filter media, a clean built-in overflow and can make a perfect cheap waterfall pond filter if desired. I'd also recommend it if you have a koi or other fish pond.
Depending on the size of your pond and pump, you can get a bigger (or smaller) tub to fit your filtering needs. The pond filter in this video uses a 14-gallon tote and works perfectly for a 1000-gallon pond and a 900 GPH pump, so you can use that as a baseline of whether you should go bigger or smaller.
Materials
- 14-gallon rugged tote
- Bulkhead – 2” slip x slip
- Bulkhead – 1.5” thread x slip
- PVC pipe 1.5” – roughly 3’ long (depends on tote size)
- PVC pipe 2” – roughly 7-8” long
- PVC end cap for 1.5” pipe
- 3-way PVC fitting
- Plastic mesh bottom tray
- Bio balls
- Mechanical filter media
- PVC connector threaded & barbed connector (to connect your pump hose to the 1.5” inlet bulkhead).
Instructions
- Use the 1.5” bulkhead to mark the hole to cut near the top side (one of the short sides) of the tote. This will be for the inlet pipe.
- Cut out the hole you just marked with a knife or hole saw.
- Install the 1.5” bulkhead through the hole and make sure it fits snug.
- Now mark the hole to cut in the side of the tote (one of the long sides) using the 2” bulkhead. Put the bulkhead about halfway up the tote.
- Cut out the hole you just marked with a knife or a hole saw.
- Install the 2” bulkhead ensuring a nice snug fit.
- Take a piece of 2” PVC pipe and drill holes in a straight line around the pipe, about 1/2 an inch from the end of the pipe. (this pipe will be roughly 4 inches long, but the length will depend on how far your outlet hole is from the bottom of the tote.)
- Connect this 4” piece to the 3-way connector, with the drilled holes on the opposite end of the connection.
- On the opposite end of the 3-way connector, install a piece of PVC pipe that is roughly 3” in length. This will be the top of the overflow.
- Connect the 3-way connector to the outlet bulkhead, with the drilled holes end closest to the bottom of the tote and the overflow opening facing the top of the tote. Ensure that the PVC pipe that will connect to the inlet bulkhead inside the tote does not hit this connector.
- Now take the piece of 1.5” PVC pipe that is just shorter than the length of the long side of the tote and drill holes in it, down the length of the pipe (in a straight line).
- Attach the end cap to this pipe and attach the other end to the inlet bulkhead.
- You can optionally drill a hole in the top of the overflow pipe and use a zip tie to secure it to the PVC pipe attached to the inlet bulkhead to keep the pipes secure and from moving around.
- Add bio-balls and any other biological filter media to the bottom of the tote. Just fill it up to an inch or two below the top of the overflow pipe.
- Cut down the plastic mesh container to fit the inside of the tote and cut a hole or slot where the overflow pipe is so you can slide the mesh container down past the overflow. This will effectively keep the bio media in place.
- Then on top of the mesh container, we can place our coarse and fine filter media. Make sure not to obstruct the overflow.
- Lastly, you just need to attach your pond pump to the inlet and set your filter next to your pond, so the filtered water can fall back into the pond.
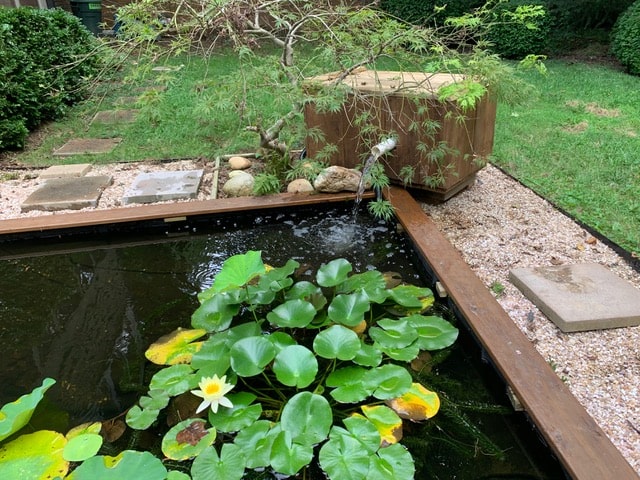
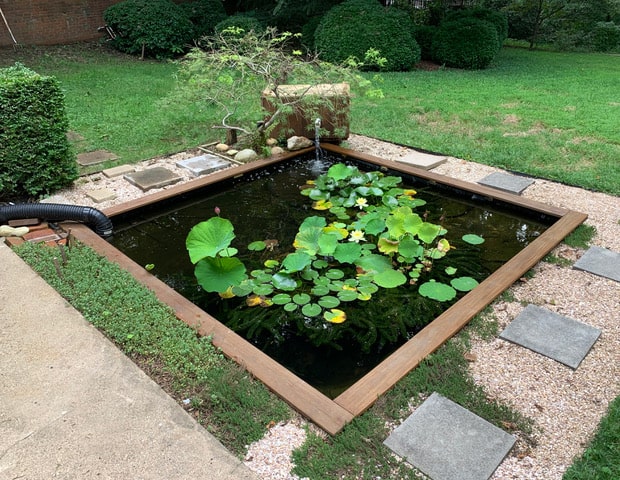
Reader Submitted Photos
Reader Stuart Armstrong was kind enough to reach out and share photos of his homemade biological pond filter he built using these instructions. He mentioned "I was happy with how it turned out. It does a great job of keeping the water clear… perfectly clear."
Click the photos below to enlarge (opens in new window).

If you make one of the DIY pond filters featured above please let us know what you think and email us some pictures/videos of the finished product!


